If you put a folder in the Dock for easy reference, are you annoyed by the default Stack view? If there are more than a handful of files in the folder this is impractical. Who do they design these operating systems for?
Here's the answer: right click on a folder that's in the Dock and you get options for viewing it, including Folder and List view.
Monday 14 December 2015
Thursday 3 December 2015
Change default screenshot format
Mac screenshots by default save in .png format. Would you prefer the default format to be JPG, or something else? Here's the simple way to change it.
From Finder, launch Terminal:
top menu Go > Utilities > Terminal
Copy and past in the following line, it's a single line with no break:
defaults write com.apple.screencapture type jpg;killall SystemUIServer
Want a different format? In this line of code, replace jpg with one of the following:
gif
PDF
png
tiff
Friday 25 September 2015
Get back Save As... in Preview and other Apple menus
Driven to distraction by Apple dropping Save As... from its app menus? The over complicated Versions function is absolutely not the answer? After 2 years, or is it 3, of irritation I have found the extremely simple! way to permanently bring back Save As... to its proper menu place.
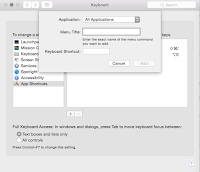
1. Open System Preferences
2. Click Keyboard, then the Shortcuts tab
3. Click App Shortcuts
4. Click + to add a new shortcut
5. In the dialogue box, select All applications or just the one you want to fix
6. Menu title must be exactly as here: Save As...
Note the three stops, and no space after As
7. Type a keyboard shortcut - for Save As... I used Alt-s , I thought memorable
8. Then just close the box, and like magic, Save As... appears in its rightful file menu place. And you can use your keyboard shortcut too.
I can't believe how long I've spent awkwardly holding down Alt while clicking File in order to be offered Save As... . So simple.


Wednesday 2 September 2015
Properly resize Excel windows for laptop screen
I work with the same Excel spreadsheets on my iMac and my Mac laptops. When Yosemite came along suddenly the spreadsheet was too large to fit the laptop screen and the tabs at the bottom were not visible.
There are various complicated workarounds but finally here is a simple answer:
Just click Window in the top menu bar and select Zoom window. A real moment of triumph, that.

There are various complicated workarounds but finally here is a simple answer:
Just click Window in the top menu bar and select Zoom window. A real moment of triumph, that.

Friday 21 August 2015
Apple AppStore - can't download purchases
Well! Solved at last after literally hours of expert Apple support phone calls. Very grateful to Apple support, absolutely outstanding, but I finally twigged myself what the answer was.
Reverting to iTunes 11 had prevented me downloading apps or updates to ones I had already purchased. System updates downloaded fine but I was unable to download 3rd party application updates and even Apple's own software purchases such as Pages, Keynote and Numbers.
Finally, I installed iTunes 12 - problem gone!
Not sure I can live with iTunes 12, but I could still go back to iTunes 11 again as in my earlier instructions.
Word for Mac 2011 - Create a Table of Contents without text or page numbers
I'm editing quite a long complex book at present, and we want to be able to see the contents at a glance simply in a text outline and move them around.
Each chapter is a separate file, with the headings marked up using Word's Styles. But simply viewing as Outline doesn't do what we want - any kind of copy and paste means all the text comes as well. Using the standard Insert ToC (Table of Contents) gives page numbers too, which aren't needed.
Here's the solution I found.
1. Insert a new page at the top of the file (Insert Page Break or Section Break if you want to retain the existing page numbering)
2. Click the Document Elements tab in the ribbon bar.
3. Click Table of Contents - see a variety of styles, remember which you prefer but don't click it (if you do you will get it automatically generated but complete with page numbers)
4. Instead, click the Settings cogwheel, and see the styles listed. Then untick Show page numbers, (bottom left). You can also set other preferences if you want to.
5. Click OK - and there's your ToC with no page numbers, but it's greyed.
Then if you want the Contents as an outline in a completely new file, you can:
- Print the current page - it will print on paper without the grey
or
- Print the current page but save it or view it as a PDF in the print dialogue
or
- Highlight and copy the ToC,
- Open a new blank Word document
- Edit > Paste Special > Styled text
Wow! your outline in a completely new document. The font may not be the same but that's easily changed in the usual way.
Monday 19 January 2015
Screen shots in Macs - a really useful guide
I'll be coming back to this one for sure, an excellent clear guide to various ways to take screen shots, relevant to OS X 10.10 Yosemite backwards.
http://www.computerworld.com/article/2476025/mac-os-x/os-x--taking-better-screenshots-on-a-mac.html
The main screen grabs are these, but do look at the full article, it's so informative.
⌘+⇧+3: Capture entire screen and save as a file.
⌘+Ctrl+⇧+3: Capture entire screen and copy to the clipboard.
⌘+⇧+4: Capture dragged area and save as a file.
⌘+ctrl+⇧+4: Capture dragged area and copy to the clipboard.
⌘+⇧+4 then Space: Capture a window, menu, desktop icon, or the menu bar and save as a file.
⌘+Ctrl+⇧+4 then Space: Capture a window, menu, desktop icon, or the menu bar and copy to the clipboard.
If you've captured a screen to the clipboard, open Preview and then do cmd-n. Preview will open your screenshot image. Further new screenshot images will open in new Preview windows.
If you'd like to change the default image file format for screenshots, here's how:
http://bit.ly/1OAUmyX
http://www.computerworld.com/article/2476025/mac-os-x/os-x--taking-better-screenshots-on-a-mac.html
The main screen grabs are these, but do look at the full article, it's so informative.
If you'd like to change the default image file format for screenshots, here's how:
http://bit.ly/1OAUmyX
Thursday 1 January 2015
Batch rename files using Finder
This is a really handy tip. Maybe you want to rename a load of images or other files with a title and sequential numbers?
In Yosemite, OS10.0, all you have to do now is select some files, right click on one and choose Rename [x] items. You can then tailor the new filenames to what you want. Amazing. There are other handy options such as making a new folder to contain the selected files.


In Yosemite, OS10.0, all you have to do now is select some files, right click on one and choose Rename [x] items. You can then tailor the new filenames to what you want. Amazing. There are other handy options such as making a new folder to contain the selected files.
Subscribe to:
Posts (Atom)
